
When you’re racing to bring a product to market, speed, accuracy, and cost-efficiency are non-negotiables.
For early-stage founders and product developers, choosing the right method—CNC machining for prototypes or 3D printing for rapid prototyping—can determine whether you stay on track or burn through your timeline and budget.
This guide examines both methods, their strengths, weaknesses, cost drivers, and where each fits in a lean product development strategy.
The Basics: What’s the Difference?
Before diving into the pros and cons, it’s important to understand how these two methods work.
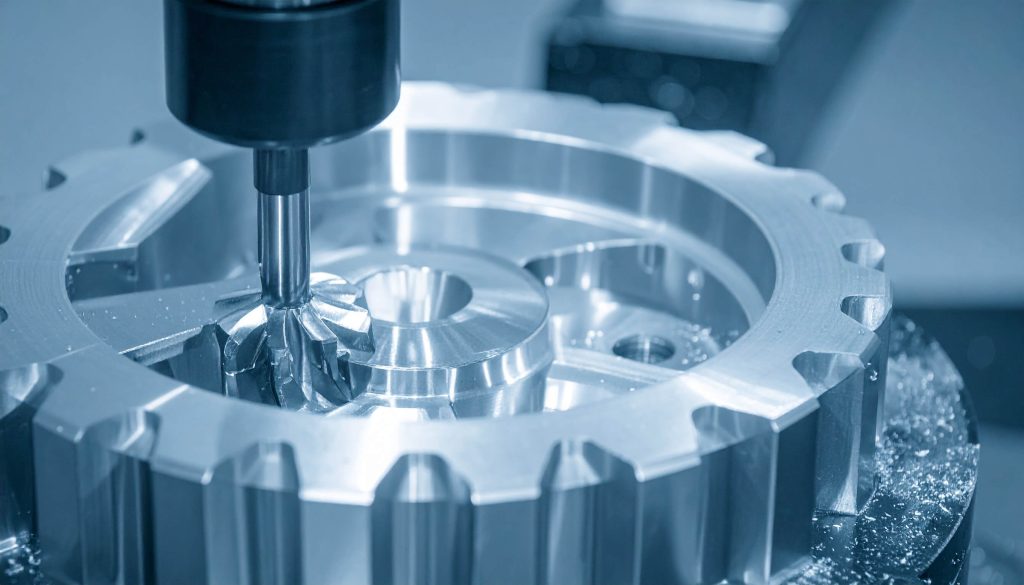
CNC Machining is a subtractive process. It starts with a solid block of material—often metal or hard plastic—and uses computer-guided tools to carve out your design. This method delivers high-precision and durable prototypes that closely mirror final production parts.
3D Printing, by contrast, is additive. It builds your part layer by layer using plastic filaments, resin, or powdered materials. This method is excellent for early design validation, especially when speed and flexibility are top priorities.
These methods are not interchangeable. Each has strengths and trade-offs that make it suitable for specific stages of the product development journey.
When to Choose CNC Machining for Prototypes
CNC machining is the gold standard when your prototype needs to look, feel, and function like the final product.
It’s ideal for functional testing, high-precision parts, and components that require structural integrity under load, heat, or stress.
Key Advantages of CNC Machining
- High Tolerance and Accuracy: CNC machines routinely deliver tolerances as tight as ±0.005”, making them the preferred method for parts that must fit precisely, like gears, enclosures, or mechanical assemblies.
- Material Realism: Unlike many 3D printing methods limited to plastic, CNC can work with production-grade materials like aluminum, brass, Delrin, and even steel. This allows for realistic testing of thermal, mechanical, and chemical properties.
- Superior Surface Finishes: Parts machined with CNC can be polished, anodized, or finished to match production aesthetics. This makes them ideal for investor demos, user testing, or pre-production sales samples.
- Durability for Real-World Testing: If your prototype needs to withstand force, vibration, heat, or pressure, CNC machining gives you a realistic preview of in-use performance.
Best Use Cases for CNC Machining
- Enclosures and brackets for consumer electronics
- Functional components in robotics or automation
- High-precision gears, fixtures, or assembly jigs
- Products that will eventually be injection molded
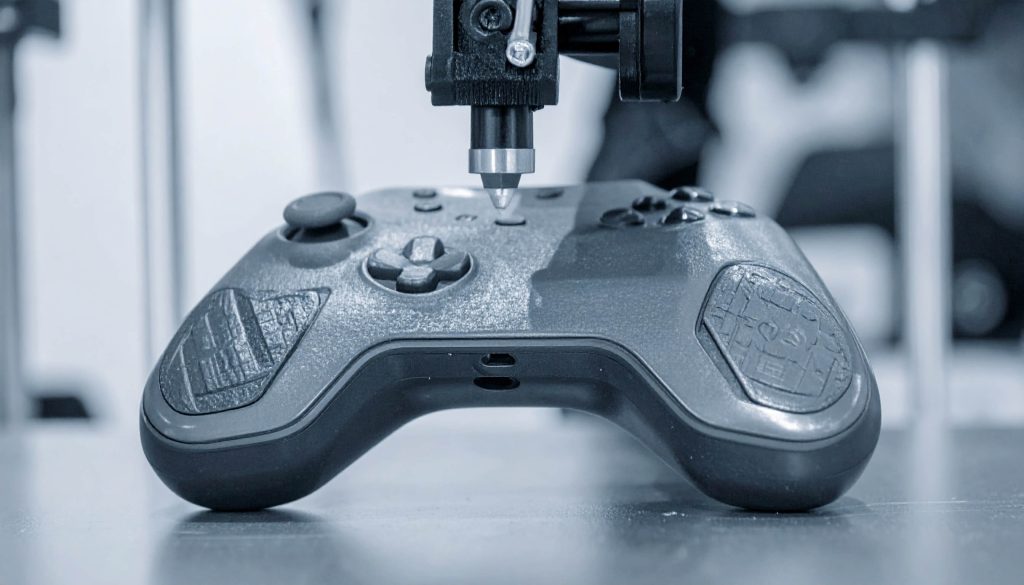
When to Choose 3D Printing for Rapid Prototyping
When speed and flexibility are more critical than precision or durability, 3D printing is often better. It allows teams to go from idea to physical form in hours, not days or weeks, making it perfect for early-stage concept validation.
Key Advantages of 3D Printing
- Ultra-Fast Iteration: Need to tweak your design five times in three days? No problem. 3D printing allows rapid design-to-part cycles without the setup time CNC requires.
- Low Material Waste: Because it’s additive, 3D printing uses only the material needed to build your part, making it more sustainable for early experimentation.
- Supports Complex Geometry: 3D printers can easily produce internal channels, undercuts, and lattice structures that would be difficult or impossible with CNC.
- Affordable for Early Testing: Material costs are low, and there’s no need for expensive tooling or fixturing—ideal for teams on a tight budget.
Best Use Cases for 3D Printing
- Ergonomic prototypes to test form and fit
- Early mockups for stakeholder feedback
- Concept models to validate size, proportion, and aesthetics
- Pre-functional parts used for investor or crowdfunding visuals
Side-by-Side Comparison: CNC Machining vs. 3D Printing
Here’s a feature-by-feature comparison to help founders make the right technical and financial call—especially when prototyping timelines and budgets are tight.
| Factor | CNC Machining | 3D Printing |
| Design Complexity | Limited by tool access, cutter diameter, and minimum radii. Undercuts difficult. | Excellent for intricate designs, undercuts, and organic shapes. |
| Material Selection | Metals, engineering plastics, composites. | Wide range of plastics, resins, flexible and composite filaments. |
| Mechanical Properties | High strength, accurate stress performance. | Good for testing; lower strength than machined parts. |
| Dimensional Accuracy | Excellent (±0.005”). Ideal for production-grade components. | Moderate (±0.02”). Accuracy depends on print type and orientation. |
| Large Part Size | Limited by machine bed, but scalable. | Limited by printer volume; larger parts require splitting/assembly. |
| Surface Finish | Smooth, post-process ready. | Often rough or layered; post-processing needed for presentation. |
| Turnaround Time | 3–7 days after setup. | Same-day to 3 days. |
| Prototyping Phase Fit | Late-stage, functional, or investor-ready samples. | Early-stage exploration and quick iteration. |
| Cost (per prototype) | Higher (setup, tooling, material waste). | Lower (no setup, minimal waste). Ideal for frequent design changes. |
Cost Drivers: What Really Affects Pricing?
Understanding what drives costs in both processes can help you make smarter design choices and avoid expensive surprises. Here’s a breakdown of what you should know.
CNC Machining Cost Drivers
- Complex Geometry: Off-angle holes, deep channels, and undercuts increase machine time and tool wear.
- Tight Tolerances: Holding ±0.005” tolerances takes longer and may require specialized tools.
- Surface Finish: Polishing or anodizing adds extra steps.
- Material Waste: Subtractive by nature—costs rise with part volume.
- Setup Time: Fixturing, programming, and tool changes require manual labor.
3D Printing Cost Drivers
- Part Volume: Material use is proportional to volume; hollowing or infill settings can reduce cost.
- Supports and Orientation: Overhangs over 45° (FDM/SLA) require sacrificial supports that must be removed.
- Layer Resolution: Higher resolution = longer print time.
- Post-Processing: Additional time and cost if polishing or painting is required.
| Feature | Cost Increase for CNC | Cost Increase for 3D Printing |
| Large, bulky geometries | High (material waste, tool wear) | Moderate (longer print time) |
| Coring / lightweighting features | Cost-reducing | Cost-reducing |
| Off-angle holes | Increases tool complexity | Often irrelevant |
| Organic/freeform features | Tooling-intensive | Easily printable |
| Tight tolerances | Time-intensive | Often not feasible |
| Smooth surface finish | Requires extra polishing | Requires sanding/coating |
| Deep holes/channels | High tool wear, harder fixturing | Depends on printer type |
Geometry Matters: Manufacturing Feasibility by Process
Some parts are just better suited for one process over the other—based on shape alone. Here’s what you need to know about feasibility.
CNC Machining Constraints
- Minimum internal radii limited by cutter size
- No enclosed voids or internal cavities
- The tool must access every feature linearly
- Undercuts are often impossible without special setups
3D Printing Capabilities
- Powder Bed Fusion (SLS/MJF): Excellent for internal cavities, no supports needed.
- FDM/SLA: Requires support structures for overhangs >45°, but ideal for organic shapes and internal channels.
If your design requires freeform geometries, enclosed chambers, or bio-inspired shapes, 3D printing is the clear choice.
Material Compatibility: Which Materials Work with Which Method?
Material selection affects everything—strength, flexibility, heat resistance, and even cost. Below is a condensed material matrix to guide your decision.
| Material | Key Properties | CNC Machining | 3D Printing | Best Use Cases |
| ABS | Impact resistant, easy to machine | ✅ | ✅ (FDM) | Great for enclosures and mixed-method prototypes |
| Nylon (PA12) | Strong, wear-resistant | ✅ | ✅ (SLS/MJF) | Gears, brackets, self-lubricating parts |
| Polycarbonate (PC) | Tough, heat-resistant | ✅ | ✅ (FDM) | Protective parts, covers, transparent components |
| Delrin (POM) | High stiffness, smooth finish | ✅ | ⚠️ (special setup) | Precision parts, cams, low-friction components |
| PEEK | Aerospace-grade, heat/chemical resistant | ✅ | ✅ (industrial printers) | Medical, aerospace, and demanding applications |
| PETG | Flexible, strong, chemically resistant | ✅ | ✅ (FDM) | Mixed assemblies with flexible joints |
| Polypropylene (PP) | Lightweight, fatigue-resistant | ⚠️ (tricky) | ⚠️ (hard to print) | Containers, flexible snap-fit parts |
Mechanical Performance: CNC vs 3D Printing by Material
Want to know how much strength you sacrifice by switching to 3D printing? Here’s how common materials compare when CNC machined vs. 3D printed.
ABS
| Property | CNC Machined | 3D Printed (FDM) |
| Tensile Strength | 40–45 MPa | 30–35 MPa |
| Impact Strength (Izod) | 200–220 J/m | 95–130 J/m |
| Elastic Modulus | 2.3–2.4 GPa | 1.8–2.0 GPa |
| Compression Strength | 46–48 MPa | 35–40 MPa |
Polycarbonate (PC)
| Property | CNC Machined | 3D Printed (FDM) |
| Tensile Strength | 65–70 MPa | 55–60 MPa |
| Impact Strength (Izod) | 600–850 J/m | 250–400 J/m |
| Compression Strength | 75–80 MPa | 60–65 MPa |
PA12 (Nylon)
| Property | CNC Machined | 3D Printed (SLS) |
| Tensile Strength | 70–85 MPa | 48–55 MPa |
| Impact Strength (Izod) | 150–180 J/m | 110–130 J/m |
| Compression Strength | 65–70 MPa | 50–55 MPa |
CNC-machined parts generally outperform 3D prints in mechanical strength. For final testing or customer-facing prototypes, CNC is the safer bet.

Hybrid Approach: The Smartest Path for Many Startups
Many lean startups and e-commerce founders are using both technologies strategically. This phased approach minimizes cost, maximizes learning, and accelerates time to market.
- Start with 3D Printing
- Validate basic form, proportions, and ergonomics
- Test the visual appeal with potential customers
- Refine designs cheaply and quickly
- Move to CNC Machining
- Test performance under load
- Validate with production-grade materials
- Create investor-grade prototypes or pre-production samples
This hybrid model is especially useful for startups validating the market via Kickstarter, Amazon, or DTC campaigns, where early feedback is critical before investing in large-scale production.
How PrototyperLab Helps You Decide (and Deliver)
If you’re unsure which method to choose or when to switch between them, PrototyperLab makes the process seamless.
Our team works with solo founders, bootstrapped startups, and e-commerce entrepreneurs to move fast without overspending.
What Sets PrototyperLab Apart
- 7-Day Prototyping—Whether it’s CNC or 3D printed, you’ll get a testable product in a week.
- $25/hour Transparent Pricing—No guesswork or inflated agency fees.
- 20-Unit Minimum Production—Skip the 500+ MOQs and test market demand affordably.
- Hybrid Engineering Support—PrototyperLab offers in-house CNC and 3D printing, so you get expert input on the right method.
- Legal Protection + Vietnam Cost Advantage—US-based contracts with Vietnam-based production mean speed and safety in one.
Whether you’re building an IoT gadget, home device, or automation tool, the PrototyperLab team guides you from CAD file to fully refined prototype—and even small-batch production.
What’s Right for Your Prototype?
There’s no one-size-fits-all solution. The best method depends on your product’s stage, purpose, and performance needs.
- Still shaping the idea? 3D printing gives you speed and flexibility.
- Ready to test performance? CNC machining offers durability and precision.
- Want a low-risk, fast launch? Use both—start lean, test early, scale smart.
PrototyperLab was built to serve innovators like you—entrepreneurs who need real products, not theory. No fluff, no bloated costs. Just results.